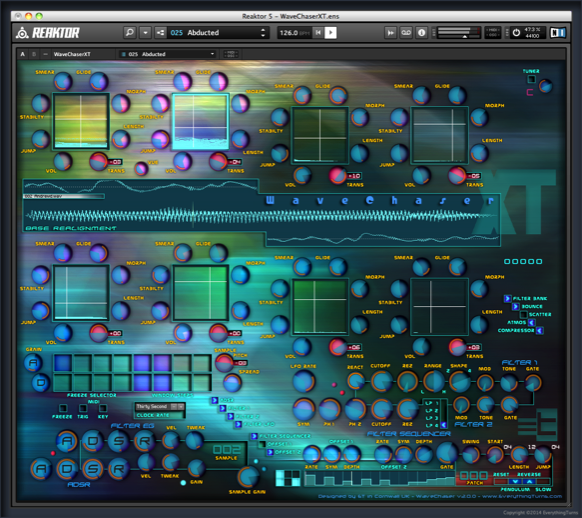

WaveChaserXT User Guide
Hover over the images to explore.
The user guide is built into the ensemble and is accessed by selecting the REAKTOR INFO button on the top right, by placing the mouse cursor over each Controller and Text Header of the ensemble, the user guide will pop up.
To use this guide select a page with the buttons above, and then move your cursor over the image, use the return arrow to go back to MoGi's main page.
Dimension Windows
CROSSHATCH
Moving the crosshatch in each window sets the start and end points of the sample being played when the window is active.
(hold down the shift key for fine-tune mode)
GLIDE IN
Sets the amount of time that the change in the waveform pitch takes effect from the last window to the current window.
MORPH
Sets the amount of time that the change in waveform position takes effect from the last window to the current window.
LENGTH
Sets the amount of time that the current window remains active before moving on to the next window.
TRANS
Sets the amount of transposition that the current window has on the sample being played.
JUMP (pitch)
Effects the pitch of the sample by adding variation to the playback speed when the window is active.
STABILITY (pitch)
Effects the stability of the JUMP (pitch) dial when the window is active.
SMEAR
Blends the grains of the sample being played when the window is active.
VOL
Sets the gain of the active window.
The waveform behind the window displays the output of the eight filters of the LFO Filter Bank.
Main Waveform Display
The main display shows the sample waveform and it's name, the two oscilloscopes show the left and right master outputs. (the small dial above the display adjusts the oscilloscopes)
The two lines in the display show the start and end points of the loop for each window that is active, they will glide around the waveform as each window becomes active.
The two lines in the display show the start and end points of the loop for each window that is active, they will glide around the waveform as each window becomes active.
Freeze Selector
The Freeze window is used to freeze any window to allow adjusting of the settings of each step of the wave sequence, to activate select the Freeze button and the sequencer will stop moving from window to window.
Next to the Freeze window is the Grain attack and Decay, these effect the overall shape of the grain output.
Freeze is also used for playing a single window via midi.
Next to the Freeze window is the Grain attack and Decay, these effect the overall shape of the grain output.
Freeze is also used for playing a single window via midi.
Window Steps
Sets the number of steps (windows) that the sequencer will play, this can be any number of steps in the range of from 2 to 8, for a single step activate the freeze button.
Next to the Steps window is the master pitch for sample playback, the spread dial alters the stereo image of the sample.
Clock Rate alters the speed that the window sequencer is running relative to the master tempo.
Next to the Steps window is the master pitch for sample playback, the spread dial alters the stereo image of the sample.
Clock Rate alters the speed that the window sequencer is running relative to the master tempo.
Filter Sequencer
The Filter Sequencer is independent to the Dimension Window Sequencer and effects the cutoff of Filters 1 and 2, plus the Filter EG and ADSR.
* IMPORTANT *
The Filter Sequencer stores it's patch data as part of the Ensemble not the Snapshot.
Changing the step arrangement in the sequencer window will alter all snapshots that use the same patch.
If you are unsure if a patch is used elsewhere always use a blank patch before altering to avoid changing an existing snapshot.
OFFSET RATE
Sets the LFO rate for offset 1and 2 of the sequencer steps.
OFFSET SYMMETRY
Sets the LFO waveform symmetry.
OFFSET DEPTH
Sets the depth of the LFO waveform.
GATE LENGTH
Sets the length of time that the gate is open, can be fine tuned via the EG dials on the filters and ADSR's.
Sets the LFO rate for offset 1and 2 of the sequencer steps.
OFFSET SYMMETRY
Sets the LFO waveform symmetry.
OFFSET DEPTH
Sets the depth of the LFO waveform.
GATE LENGTH
Sets the length of time that the gate is open, can be fine tuned via the EG dials on the filters and ADSR's.
PATCH SELECTOR
There are 128 patches available.
RESET
Resets the sequencer clock.
PENDULUM
The sequencer will swing in a pendulum manner when switched on.
REVERSE
The sequencer will play in reverse when switched on.
SLOW
Slows down the sequencer by 50% when switched on.
There are 128 patches available.
RESET
Resets the sequencer clock.
PENDULUM
The sequencer will swing in a pendulum manner when switched on.
REVERSE
The sequencer will play in reverse when switched on.
SLOW
Slows down the sequencer by 50% when switched on.
Filter ADSR
Filter one is a variable multimode filter consisting of a resonant low pass - band pass - high pass design with variable two or four pole slope, the filter shape and tone is enhanced with the use of the Filter EG as well as key and velocity via midi.
In addition to having ADSR control the Filter EG waveform output can also play a part in shaping the contour of the sound, as can the Filter Sequencer.
Filter two is a slightly more conventional filter consisting of a switchable 1 - 2 - 3 or 4 pole low pass design with resonance, again the filter can be influenced via the EG, sequencer and midi.
Bolted in-between the filters is the LFO modulation, when the LFO waveform is positive it can lift the cutoff of filter one, as the waveform goes into its negative phase it can lift the cutoff of filter two, this produces a gentle or not so gentle sweep of the filters, breathing even more life to the sound.
Last in the chain is the amp ADSR with key and velocity control via midi, plus the Filter Sequencer is linked to the ADSR.
LFO Filter Bank
The Filter Bank will sync to the Filter Sequencer, free run or the LFO can be switched off turning the filter bank into 8 variable bandpass kill filters. (all dials down no signal will get through)
The 8 stereo filters are made up from 32 single pole HP and LP combined filters (16 left and 16 right), the filters are equally spaced from low to high, the position that each filter sits is set by the Shift dial (LFO phase linked), so as the LFO travels through it's range the filters will move up and down the spectrum and across the stereo field. (if the LFO is synced to the SEQ the filters will jump in frequency and around the stereo field on each gate pulse.
When using the SEQ as a sync for the filter bank the phase will sync to the gate trigger, pushing the phase on each pulse, so you need to set the phase and filters to suite the sound.
Auto Panner
The Auto Panner is placed before the master outputs and can be bypassed with the small mute switch.
As this is the last stage in the signal chain the gain and pan dials are useful for adjusting the overall balance of the stereo image, the auto pan will only have an effect if the depth controls are above zero.
LFO adjusts the movement speed of the panner and depth effects the width and placement.
The symmetry and phase dials adjust the waveform shape, both outputs 1 and 2 are independent of each other.
Matrix Patch Bay
The matrix patch bay allows you to route the post synth effects in any order and has a stereo bus.
The effects are simply chained together out to in, if you've understood the matrix patcher then this will be easy.
You can swap the stereo signals and mono the effects, and they can be patched in parallel or series.
* WARNING *
It is possible to overload Reaktor by adding to many effects to a patch, you have to go with the CPU power that you have - Under no circumstances select everything with Reaktor's CPU power dial set of off and save your ensemble, you may never be able to load it again. (reaktor starts up with the power on)
Effect Processors
BOUNCE DELAY FLANGER
Stereo delay with variable left and right delay times, linked to a stereo flanger.
(the flanger is actually 1st in the chain)
ATMOS SPACE
Stereo reverb with a pre delay and delay symmetry, low - mid - high eq followed by low and high cutoff filters, the pre delay, eq and filters give this reverb the ability to occupy a different space to the signal that it is receiving.
SCATTERVERB
The scatter processor creates lush modulated analog delay and reverb effects, by using 8 diffuser delays.
COMPRESSOR
The In dial sets the compression threshold, and the out dial sets the Master Output Gain.
LIMITER
The Automatic Clip Limiter is not part of the compressor and is hardwired at the end of the signal chain it's just doing it's thing, no need to worry about it.